Easy DIY Bathroom Update
Want to update your bathrooms with an easy DIY project?
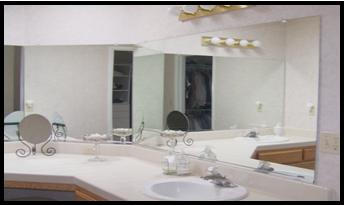
Take your bath from this:
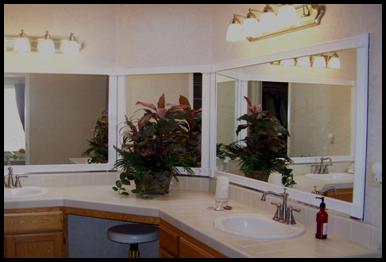
To this:
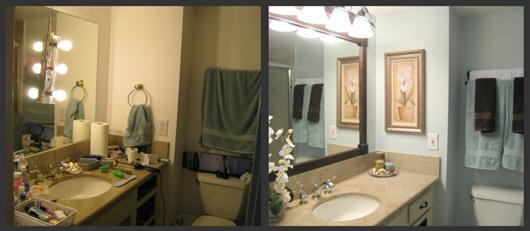
A number of things were changed out in this master bathroom to prepare it for for resale but the easiest DIY project here was framing out those expansive plate glass mirrors.
Here’s one more photo example:
- Tools needed: saw, caulking gun, sand paper, measuring tape, razor blade.
- Supplies needed: paints (primer, finished paint color and black), door casing or other wood trim (1.5 – 3 inches wide), corner rosettes, mirror adhesive (I use lok-tite glass adhesive), painters masking tape.
1) Measure the mirror and purchase wood trim (I’ve used door casing and fluted trim to cover the perimeter of the mirror. Purchase wood rosettes for each corner. I use rosettes to eliminate the need to carefully cut corner miters.
2) Cut the wood to fit each side. Sand raw edges as needed. Dry fit on the bottom of the mirror with the rosettes. Trim if needed.
3) If the mirror is attached to the wall with a “j” channel the wood trim goes on over the top of the metal. If you have plastic clips holding the mirror in place you may need to carefully chisel out slots in the wood trim, making this project a bit more complicated.
3) Paint the back of all pieces flat BLACK. The back of each piece of molding will be reflected in the mirror so don’t neglect this step.
4) Paint the fronts, ends and sides of each piece of wood and the rosettes with primer. Let dry and paint 1-2 coats of the finished color. I usually recommend a satin or eggshell finish unless you need extra scrubbing durability, then use a semi-gloss.
5) Apply adhesive to the back of the wood in long lines running the length of the molding. Stay at least ½ inch away from the edges or glue may seep out when applied to the mirror. Read can directions for how to remove excess if needed. Usually a razor blade is the answer but don’t wait long. I prefer using a product with a caulking gun because my hands don’t do well with squeeze tubes. The product itself is more important than your method.
6) Apply the molding trim to the mirror, starting at the bottom edge, then the bottom corner rosettes. The correct construction adhesive will set up quickly but let this bottom piece and the two corners set-up/dry completely before proceeding. Check for level before they start to set-up. . If necessary you can use tape to help hold the wood in place while it’s drying.
7) Next, apply the sides and again wait until they’re dry before doing the top pieces. Use the tape to help hold the top horizontal piece in place while it’s setting up. Check for plumb. (is it really straight left to right)
8) Reserve some touch-up paint in a small container.
Step back, enjoy the new look and your handy work!
When this project is complete you’ll probably want more updating, especially if it’s in your bathroom. Simple steps and projects can have a large impact. If you want to know about color choices, how to change lighting fixtures, plumbing fixtures and more, let me know at:
www.dreamredesigns.com or ginger@dreamredesigns.com
![]()